OpenStack基礎(chǔ)服務(wù)安裝超詳細(xì)指南(附虛擬機(jī)配置截圖)
OpenStack基礎(chǔ)服務(wù)安裝超詳細(xì)指南(附虛擬機(jī)配置截圖)
一、安裝環(huán)境準(zhǔn)備
1.1 虛擬機(jī)配置要求
建議使用以下配置(以VMware Workstation為例):
控制節(jié)點(diǎn)(Controller Node)
- CPU:4核心或以上
- 內(nèi)存:8GB或以上
- 磁盤:100GB(系統(tǒng)盤)+ 100GB(存儲(chǔ))
- 網(wǎng)絡(luò):兩張網(wǎng)卡(管理網(wǎng)絡(luò)+外部網(wǎng)絡(luò))
計(jì)算節(jié)點(diǎn)(Compute Node)
- CPU:4核心或以上(支持虛擬化)
- 內(nèi)存:16GB或以上
- 磁盤:100GB系統(tǒng)盤 + 200GB數(shù)據(jù)盤
- 網(wǎng)絡(luò):兩張網(wǎng)卡
1.2 操作系統(tǒng)安裝
推薦使用CentOS 7或Ubuntu 20.04 LTS。以下以CentOS 7為例:
1. 下載CentOS 7鏡像并創(chuàng)建虛擬機(jī)
2. 安裝時(shí)選擇最小化安裝(Minimal Install)
3. 配置網(wǎng)絡(luò):`bash
# 編輯網(wǎng)絡(luò)配置文件
vi /etc/sysconfig/network-scripts/ifcfg-ens33
設(shè)置靜態(tài)IP
BOOTPROTO=static
ONBOOT=yes
IPADDR=192.168.100.10
NETMASK=255.255.255.0
GATEWAY=192.168.100.1
DNS1=8.8.8.8`
1.3 基礎(chǔ)軟件包安裝
`bash
# 更新系統(tǒng)
sudo yum update -y
安裝必要工具
sudo yum install -y vim wget curl net-tools git
安裝OpenStack倉庫
sudo yum install -y centos-release-openstack-ussuri
sudo yum update -y
安裝OpenStack客戶端
sudo yum install -y python-openstackclient openstack-selinux`
二、數(shù)據(jù)庫服務(wù)安裝(MySQL/MariaDB)
2.1 安裝MariaDB
sudo yum install -y mariadb mariadb-server python2-PyMySQL2.2 配置MariaDB
創(chuàng)建配置文件:`bash
sudo vi /etc/my.cnf.d/openstack.cnf`
添加以下內(nèi)容:`ini
[mysqld]
bind-address = 192.168.100.10
default-storage-engine = innodb
innodbfilepertable = on
maxconnections = 4096
collation-server = utf8generalci
character-set-server = utf8`
2.3 啟動(dòng)并配置MariaDB
`bash
# 啟動(dòng)服務(wù)
sudo systemctl enable mariadb
sudo systemctl start mariadb
安全配置
sudo mysqlsecureinstallation`
三、消息隊(duì)列服務(wù)安裝(RabbitMQ)
3.1 安裝RabbitMQ
sudo yum install -y rabbitmq-server3.2 配置RabbitMQ
`bash
# 啟動(dòng)服務(wù)
sudo systemctl enable rabbitmq-server
sudo systemctl start rabbitmq-server
添加OpenStack用戶
sudo rabbitmqctl adduser openstack OPENSTACKPASS
設(shè)置權(quán)限
sudo rabbitmqctl set_permissions openstack "." "." ".*"`
四、緩存服務(wù)安裝(Memcached)
4.1 安裝Memcached
sudo yum install -y memcached python-memcached4.2 配置Memcached
`bash
# 編輯配置文件
sudo vi /etc/sysconfig/memcached
修改為控制節(jié)點(diǎn)IP
OPTIONS="-l 127.0.0.1,::1,192.168.100.10"
啟動(dòng)服務(wù)
sudo systemctl enable memcached
sudo systemctl start memcached`
五、身份認(rèn)證服務(wù)(Keystone)安裝
5.1 創(chuàng)建數(shù)據(jù)庫
`bash
mysql -u root -p
CREATE DATABASE keystone;
GRANT ALL PRIVILEGES ON keystone. TO 'keystone'@'localhost' IDENTIFIED BY 'KEYSTONE_DBPASS';
GRANT ALL PRIVILEGES ON keystone. TO 'keystone'@'%' IDENTIFIED BY 'KEYSTONE_DBPASS';
FLUSH PRIVILEGES;
EXIT;`
5.2 安裝Keystone
sudo yum install -y openstack-keystone httpd mod_wsgi5.3 配置Keystone
`bash
# 編輯配置文件
sudo vi /etc/keystone/keystone.conf
配置數(shù)據(jù)庫連接
[database]
connection = mysql+pymysql://keystone:KEYSTONE_DBPASS@controller/keystone
配置令牌提供者
[token]
provider = fernet`
5.4 初始化數(shù)據(jù)庫
sudo su -s /bin/sh -c "keystone-manage db_sync" keystone5.5 初始化Fernet密鑰
keystone-manage fernet_setup --keystone-user keystone --keystone-group keystone
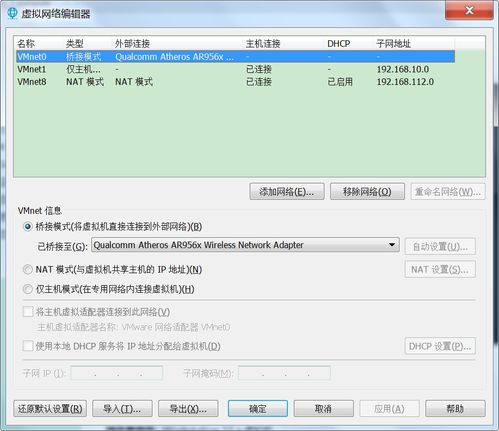
keystone-manage credential_setup --keystone-user keystone --keystone-group keystone六、虛擬機(jī)配置截圖參考
6.1 網(wǎng)絡(luò)配置截圖

說明:管理網(wǎng)絡(luò)使用NAT模式,外部網(wǎng)絡(luò)使用橋接模式
6.2 磁盤分區(qū)截圖

說明:建議使用LVM分區(qū),便于后續(xù)擴(kuò)展
6.3 內(nèi)存與CPU配置

說明:根據(jù)實(shí)際需求調(diào)整資源分配
七、驗(yàn)證安裝
7.1 檢查服務(wù)狀態(tài)
`bash
# 檢查數(shù)據(jù)庫服務(wù)
sudo systemctl status mariadb
檢查消息隊(duì)列
sudo systemctl status rabbitmq-server
檢查緩存服務(wù)
sudo systemctl status memcached`
7.2 測試Keystone服務(wù)
`bash
# 設(shè)置管理員環(huán)境變量
export OSUSERNAME=admin
export OSPASSWORD=ADMINPASS
export OSPROJECTNAME=admin
export OSUSERDOMAINNAME=Default
export OSPROJECTDOMAINNAME=Default
export OSAUTHURL=http://controller:5000/v3
export OSIDENTITYAPIVERSION=3
獲取令牌
openstack token issue`
八、常見問題解決
8.1 網(wǎng)絡(luò)連接問題
- 確保防火墻已正確配置
- 檢查SELinux狀態(tài)
- 驗(yàn)證網(wǎng)絡(luò)接口配置
8.2 服務(wù)啟動(dòng)失敗
- 檢查日志文件:/var/log/[service-name]/
- 驗(yàn)證配置文件語法
- 檢查依賴服務(wù)是否正常運(yùn)行
8.3 數(shù)據(jù)庫連接問題
`bash
# 測試數(shù)據(jù)庫連接
mysql -h controller -u keystone -p`
九、下一步計(jì)劃
完成基礎(chǔ)服務(wù)安裝后,可以繼續(xù)安裝以下服務(wù):
- 鏡像服務(wù)(Glance)
- 計(jì)算服務(wù)(Nova)
- 網(wǎng)絡(luò)服務(wù)(Neutron)
- 塊存儲(chǔ)服務(wù)(Cinder)
- 儀表板服務(wù)(Horizon)
十、注意事項(xiàng)
- 所有密碼應(yīng)使用強(qiáng)密碼并妥善保管
- 生產(chǎn)環(huán)境建議使用分離的硬件節(jié)點(diǎn)
- 定期備份數(shù)據(jù)庫和配置文件
- 關(guān)注OpenStack官方安全公告
本教程基于OpenStack Ussuri版本,其他版本可能略有差異
截圖僅為示例,實(shí)際配置請(qǐng)根據(jù)環(huán)境調(diào)整
如若轉(zhuǎn)載,請(qǐng)注明出處:http://www.gzhuanai.com/product/56.html
更新時(shí)間:2026-05-12 04:54:51